CSS tips and tricks for Squarespace
With the release of our brand new range of Squarespace plugins, I thought it would be beneficial to write an article on some helpful tips and tricks that go into individualising websites with CSS
I spend a lot of my time with code (cool, I know) and I’m always looking to add a distinct flourish to websites with CSS.
If you’re like me, and want to push beyond the standard design of Squarespace templates, then I’ve put together a small guide to using CSS in Squarespace that I think will help you.
Just a little disclaimer, the browser that I am using in this guide is Google Chrome; this isn’t to say that the content of this blog post is irrelevant to other browsers, but be aware that certain names or functionality may be different in your browser.
What is CSS?
Before I take you into any of the cool stuff, I’ll need to briefly cover what CSS is.
CSS stands for “Cascading Style Sheets”, and is used in conjunction with HyperText Markup Language (HTML) to define the structure and style of a web page respectively.
If you’re struggling to understand the difference, think of HTML as the blueprint to a house, as it defines the layout of the building, and think of CSS as the interior design, as it defines the house’s style.
How do I add it to my Squarespace site?
Squarespace offers a few ways to add custom CSS to your site.
The first, and most common, way to add custom CSS to your site is via the custom CSS panel from the primary navigation.

From here, you are able to add CSS code that will apply the styles site wide.
Be aware, this means that if you were to target an H2 tag (more on this later) on a particular page via the custom CSS panel, any styles that were given to the tag would subsequently be carried across to every H2 tag on the website.
Another common way to add CSS to your site is through the page header code injection area, found in the advanced settings on each page.
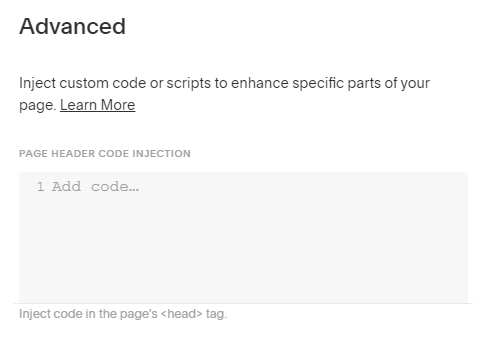
This method is the opposite of the previous, meaning that all CSS styles added in this section will only effect the HTML tags on a page-by-page basis.
There are other methods to add custom code into your Squarespace site, such as code blocks, but these are primarily used to render HTML or Markdown, and are outside the scope of this guide.
How do I add CSS to Squarespace elements?
Now we’re getting onto the fun stuff.
Most browsers will have inbuilt functionality that allow their user to inspect various HTML elements on a webpage during runtime; this is known as the “DOM Inspector” and can be found by right-clicking and selecting “Inspect”.

The DOM Inspector may seem complicated at first, but after you’ve had a little poke around and found what you’re looking for you’ll realise how powerful it is.
It’s value comes from the fact it allows you to view every HTML element on your webpage, as well as associated CSS styles with the element you are inspecting.
I will be writing a more in-depth guide as to how to use the DOM Inspector, but for the sake of this guide we’ll only be focusing on the “Element Selector”, which is the first icon on the top left of the DOM Inspector.
If you click on this icon and then move your mouse over the element you want to inspect, you’ll see that it highlights the element. If you then click on that element, it’s place in the website code is highlighted under the “Elements” tab, as well as its associated CSS details.

You can then take this CSS information and modify it in the custom CSS panel or in the page header code injection area.
However, if you’d rather avoid the DOM Inspector, then there’s a handy little Google Chrome plugin that automatically finds the CSS details for you.
This plugin is called the “Squarespace Collection/Block Identifier” and can be found here.
This plugin will display the block ID of any Squarespace element on your webpage, but does not offer the same comprehensive insight into the structure of your webpage that the DOM Inspector does.
BONUS - How can I add custom HTML elements into my site?
Squarespace facilitates the ability to add bespoke HTML elements onto your website.
In this example, we will be making use of the Squarespace Markdown block and HTML heading elements.
By default, Squarespace allows only three different sizes of headings, and before I bore you with HTML semantics (and why this is actually a good thing), we’ll be adding an extra three headings that can be used throughout the site, as HTML actually provides six heading tags.
Add a Markdown block into your site and copy the following:
# Heading 1 ## Heading 2 ### Heading 3 #### Heading 4 ##### Heading 5 ###### Heading 6This is a shorthand for creating headings in a markdown block and it’s quite intuitive - a number of hashes for the heading you want.
If you were to save the page after adding the code, you’ll notice that the first three headings will be formatted as they should, but the latter three will not; this is because there are no styles for these elements.
Now we’ll add the CSS code for the last three headings:
h4 h5 h6As mentioned at the start of the guide, you can either add this to the custom CSS panel or the page header code injection area.
I hope you’ve found this helpful, or at the very least interesting! :)